
It’s Friday, and someone asks whether the launch worked. You can count how many posts went out. You might even know which one got the most likes. The harder question is which posts got people to the site, and which of those visits ended in a signup.
Bolta brings those questions into the same workflow. Campaigns gives a launch a brief, channels, dates, and a plan. Automations Insights shows whether the work made it from draft to published. Campaign Insights shows which tracked posts people clicked and, when you connect your web analytics, what visitors did on your site. That makes it possible to follow a result back to the post and decide what to change for the next run.
This guide walks through a two-week signup campaign as an example. You can use the same setup for an event registration, a demo request, or another action your site can measure.
Start with one campaign and one result
Open Automations in Bolta, choose Campaigns, then select New campaign. A content campaign is a one-to-four-week plan around a defined launch, offer, or event. A routine is the work you want to repeat, like a LinkedIn tip every week. When an announcement has a deadline and you want to read its results together, give it a campaign of its own.
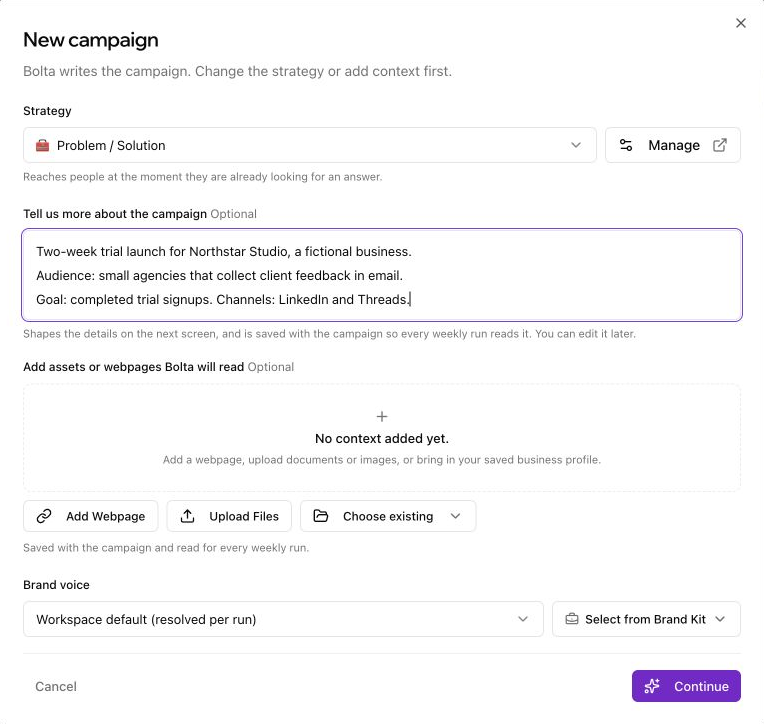
Start in New campaign. Pick a strategy and give Bolta the audience, goal, and source material before you continue.
Here’s a practical first brief for a fictional new product:
- Goal: Get people to create a trial account.
- Audience: Small agency teams that currently organize client feedback in email.
- Destination: A trial page on your site with your analytics installed.
- Dates and accounts: Two weeks, with posts on your LinkedIn company Page and Threads account.
- Content: A launch announcement, a short workflow example, and a final reminder. Give each post one reason to click.
- Conversion: The event your site records once a trial signup successfully completes.
Set the campaign dates, target accounts, voice, and content mix. Add source material the drafts can draw from, such as the launch page, key dates, FAQs, approved product claims, and the signup URL. Review the plan before starting. If posts require team or client approval, check who owns that step and give them enough time before launch. Activation starts the campaign workflow. The brand’s publishing and approval settings determine when individual posts can go out.
What to check before you start the campaign
- Match the strategy to the message. In this example, Problem / Solution gives the posts a starting point. Show a specific client feedback problem, show what changes with the product, and invite the reader to try it.
- Give the writer a source for every important claim. Use Add Webpage for the launch page, Upload Files for an approved brief, or Choose existing to reuse material already in Bolta. Include the exact CTA and link. You can select a specific brand voice or use the workspace default.
- Review the proposed plan after Continue. Check the audience, dates, accounts, and mix for each week. The sample launch uses an announcement in week one, a workflow walkthrough to answer a common objection, and a last reminder near the end.
- Check who can move a draft to the calendar. If a client needs to approve it, send the request early enough to make the publishing window. Assign one person the job of checking the first live post and testing the link.
Confirm the destination before committing to the plan. A general homepage link tells a different story than a trial page built for this offer. Keep the destination consistent when comparing post angles, so the change you’re evaluating is in the post itself.
For the first run, keep the call to action small and clear. Put a working link in each post that should drive signups and preview the destination account and copy before approving. If you add a post by hand, associate it with the content campaign before it publishes. That timing matters for attribution.
Follow the link from a published post to your site
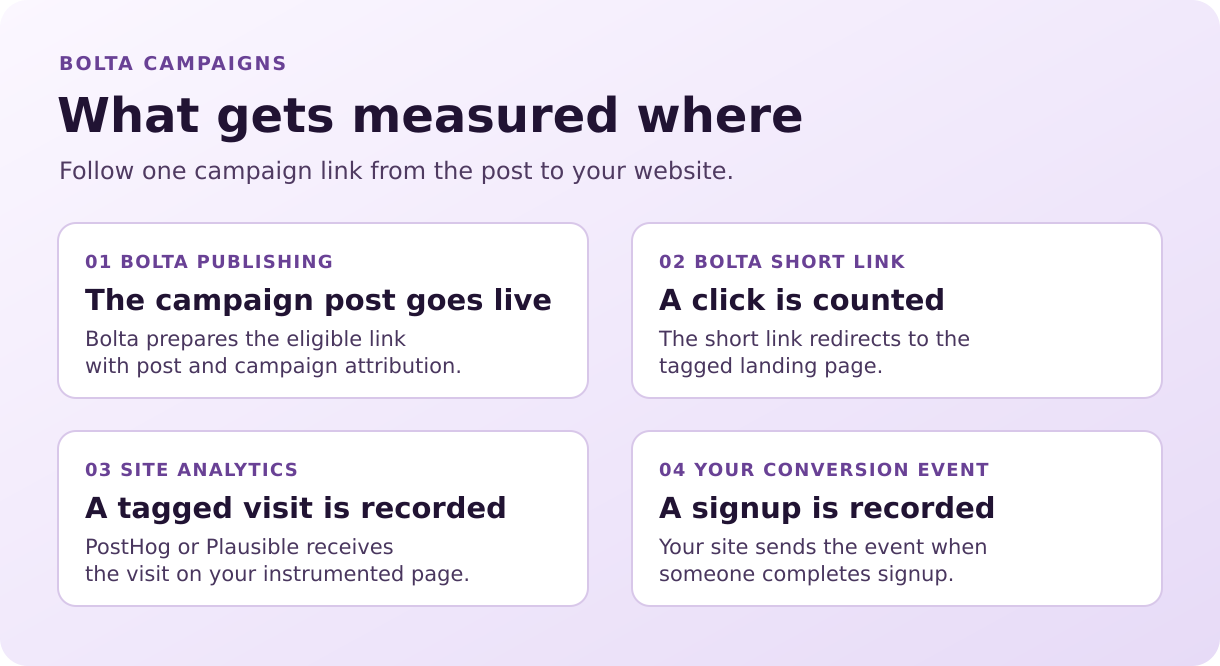
Bolta measures the redirect click. Your website analytics measures the visit and the conversion.
A single campaign can have several posts pointing at the same signup page. Bolta can still distinguish those posts. Here’s what happens on an eligible link as a campaign post publishes.
- Bolta prepares the destination URL. The tracking tags identify traffic from Bolta, the content campaign, and the post. Those details can survive the trip from a social app to your website.
- The published link can use a Bolta short URL. When somebody follows it, the short link records the redirect click and sends them to the tagged destination. Bolta filters known automated traffic at the redirect. A person can still click more than once.
- Your analytics measures the visit. When the landing page loads and the analytics script captures it, PostHog or Plausible can read the tags. This step depends on the destination page, the provider setup, and the visitor’s consent and browser settings.
- Your site records the result. On successful signup, your site or app sends the event you configured. Bolta can read aggregate visits and conversions back from the connected provider and show them with the corresponding campaign and posts when attribution is available.
For an ordinary destination URL, the tags you may see are utm_source=bolta, utm_medium=social, utm_campaign with the campaign ID, and utm_content with the post ID. The campaign value is a stable ID. In an analytics dashboard, use the value from the actual landing URL when filtering for it. The post ID lets Bolta connect traffic back to one post even when several posts share the destination.
A destination URL in this example might look like this, with sample identifiers:
https://example.com/trial?utm_source=bolta&utm_medium=social&utm_campaign=campaign-id&utm_content=post-id
Check the URL after following the link from the live post. The short address in the post can hide the query string, and the landing address reflects what your analytics script can actually read. If you need to check two posts linking to the same page, compare the final utm_content values. They let you verify that the posts are distinguishable in the report.
Check the link you publish. Bolta preserves existing UTM parameters. If you supplied your own UTMs, keep using them in your own reporting and verify whether those links carry the tags needed for the in-app report. Also check links on posts that went live before tracking was available or before you added them to the campaign. Adding a post to a campaign later can group it in the report, but it can’t retroactively change the link people already saw. For clean attribution, add the post to its intended campaign before publishing, then inspect the link from the public post.
Connect PostHog or Plausible and choose a real signup event
Start with the provider already installed on the landing page. Open Insights in Bolta, select Content, then Campaigns. Find On your site and open the analytics connection. A workspace owner or admin can connect or edit the provider. The connection reads aggregate data from your analytics project. Your site still needs its own tracking to send pageviews and events.
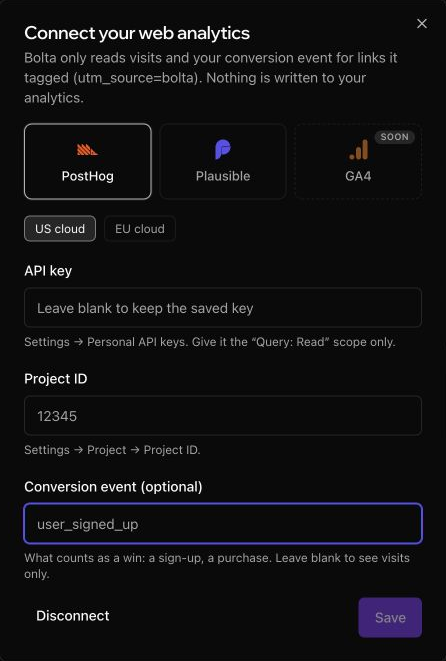
In the PostHog setup, enter the host, project ID, and the event name used by the site you’re measuring.
If you use PostHog
- In PostHog, open Settings → Project and find the numeric Project ID for the site that receives the campaign traffic.
- In Settings → Personal API keys, create a key with Query: Read for that project. Use the personal read key in Bolta’s API key field. The project key used to send events from your site serves a different purpose.
- In Bolta, select PostHog and choose the cloud region for that project. Enter the Project ID and the personal API key in the connection form.
- Enter the exact name of the event that fires when signup succeeds. For instance, use
user_signed_upif that’s the event your app actually sends. You can leave the field empty to start with visits and add the event after it’s in place. - Save and check the connection. If Bolta says it hasn’t seen the named event, trigger a test signup and check the event in PostHog. Copy its actual name back into Bolta if it differs.
Send the event on successful account creation, when you know signup completed. A Sign up button click measures intent. A submitted form may still fail validation. A completion event lets you judge the outcome you set in the campaign brief. PostHog’s guide to conversion goals covers creating and using these events.
For the PostHog readback, Bolta counts visits from tagged pageviews and looks for the configured event in the same recorded session. If signup happens later, across domains, or through an auth redirect, the visit and completion can land in different sessions. A backend-only signup event can also be missing the session association. Validate the full path in your provider before using the number to judge the campaign. Use a separate PostHog funnel for a longer lookback or a different attribution model. PostHog’s UTM guide explains event, session, and person-level tags.
If you use Plausible or GA4
For Plausible, choose the provider in the same Bolta form. Enter the site domain exactly as it appears in Plausible, a Stats API key, and the name of the configured goal you want counted. If your site sends a custom event, create a matching goal in Plausible and test that it records. Use the exact goal name in Bolta. Plausible’s custom event guide walks through the setup.
The in-app visits and conversions connection currently supports PostHog and Plausible. If you use GA4, you can use the tagged landing URLs with GA4’s own acquisition and key-event reports. Filter there using the campaign and source from the published link. Google’s guide to manual campaign tagging maps the tags to GA4’s dimensions.
Run one test before you read the chart
Test the actual customer path with one live campaign post whose link you can open.
- Start on the social platform. Open the link from the published post. This tests the link the reader saw, including any social platform wrapper.
- Check the destination. Confirm the intended page loads and the query string still has the expected tags after any redirects. A checkout redirect or link to a different domain can change what gets captured.
- Find the landing pageview in your provider. Look in the correct PostHog project or Plausible site. Confirm the campaign, source, and post tags are present where your provider reports them.
- Complete a test signup if you can do so safely. Use your own test flow or approved test account. Confirm that the success event fired once and, for the PostHog report in Bolta, that it belongs to the same recorded session as the landing.
- Check the report after it refreshes. Compare the relevant campaign or post within the same reporting range. Small differences can be normal. The link counter measures redirects. The analytics provider measures visits and conversions it captured on your site.
Make the test easy to reproduce. Record the post, the final landing URL, the test time, and the exact signup event name. In PostHog, open the landing pageview and check its UTM properties. Then open the signup event and compare the session identifier when available. A fresh browser session or an approved test profile helps you distinguish this visit from earlier traffic. If analytics only runs after consent, go through the same consent path a typical eligible visitor would follow. The record gives you something specific to share with the person who owns the site if the visit or event goes missing.
If Campaign Insights shows no tracked links, inspect one published post. It may have no clickable destination, may have gone out before link tracking was available, or may have published before it joined the campaign. Check the campaign association and URL on the next post you publish. The report can then count genuine clicks, including zero clicks when a tracked link exists and nobody has followed it.
If you see clicks but no tracked visits, start with the final destination. Is it your own instrumented page? Is the provider on that page and in the same project you connected? Did a redirect drop the tags? A post that sends people to YouTube, a partner’s site, or a third-party booking page can earn clicks even when your analytics can’t see what happens there.
If you see visits but no signups, complete one controlled test before changing the message. Check that the event name matches, that the event fires after success, and that the provider can tie it to the incoming session. Once those checks pass, a real drop between visits and signups gives you a reason to inspect the landing page, offer, or registration flow.
Use Automations Insights to see where the work stalled
Go to Insights → Automations and select the range you want to review. Start with Key insights for the changes that need attention, then open Routines & campaigns to inspect the work behind them. A campaign that fell short can have a publishing problem, a review problem, or a content problem. The workflow numbers help you pick which one to investigate.

Open a row in Routines & campaigns to inspect the work behind it. Workspace values are hidden in this screenshot.
- Created and published: See how many posts the routine or campaign produced and how many reached publication. A high draft count can hide a small published sample.
- Waiting and blocked: Check where work is sitting. If posts are waiting for sign-off, open the relevant review queue and assign a reviewer or a review window. If posts failed, check delivery or account issues before asking the writers for more.
- Approval rate and time to decision: Approval rate uses the latest team decision on posts that received one. A post that’s still waiting belongs in the queue count. Use the number of decisions and the median time from creation to decision alongside the rate. A high approval rate can coexist with a slow review process.
- Engagement per published post: Compare output and response together. The report uses platform-reported signals such as likes, comments, shares, and views where available. Compare similar accounts and formats before treating a mixed-channel total as a verdict.
For example, suppose a weekly routine drafted six posts and two went live. Four are still waiting for approval. Start by giving the reviewer a calendar slot. If the next run publishes on time and people still rarely click, you can test new hooks or calls to action. The order matters because a workflow that hasn’t delivered enough posts hasn’t given the copy a fair test.
Start with the row that explains the missed result
Pick the campaign or routine by name and expand its row. If you’re checking a missed launch date, start with Posts, Review, and Published. The Time to decision column tells you about completed team decisions. The waiting count tells you about work that still needs one. Read the two together. A quick decision on the first post can coexist with a backlog on the rest.
Then check what’s holding the work, where the report has details. A draft waiting for approval needs a reviewer. A post that was approved but has no time needs scheduling. A failed publish needs an account or format check. Each calls for a different owner. After the next run, check the same row with a comparable date range to see whether your change helped more posts get out.
Use Campaign Insights to decide what to repeat
Open Insights → Content → Campaigns for the outcome side of the same work. Read your campaign’s published posts, engagement, tracked clicks, and On your site results. Look at the individual posts behind the totals where data is available. With connected analytics, you can also look at landing pages and conversions alongside the visit count.

On your site surfaces visits, the configured conversion, and landing pages. Project details and values are hidden in this screenshot.
Consider an illustrative example. A launch announcement gets 80 tracked clicks, 50 recorded visits, and two signup sessions. A walkthrough gets 27 clicks, 20 visits, and four signup sessions. In that sample, the announcement brought more people to the site. The walkthrough brought fewer people and turned a larger share of its measured visits into signups. Using provider visits as the denominator, that’s 4% for the announcement and 20% for the walkthrough in this example. The counts are small, so give the walkthrough another test before drawing a firm conclusion. You might borrow its specific demonstration for the next announcement.
Read the campaign total, then check the post
- Match the time windows. Start with the dates the posts were live and check which period is visible in each report. Give late posts time to collect visits before comparing them with posts that have had days to run.
- Open Posts that brought people to your site. Look at the posts behind the aggregate. Without connected site analytics, this view can rank by tracked clicks. With the connection in place, it can show measured visits and conversions when the post is attributable.
- Check Where they landed. Use the landing-page list to see which pages received tracked visits. If several campaigns share a page, filter by the campaign tag in your analytics provider to isolate that campaign. Before rewriting a post, check whether its link lands on the page that actually has the signup button and event tracking.
- Write down one change for the next run. For the example above, reuse the walkthrough’s demonstration in a fresh post. Keep the account, offer, and destination steady so you can learn more from the new result.
Use the numbers to make one decision at a time:
- Published posts with few clicks: Check that the links are actually in the live posts. Then try a clearer reason to click or a more useful call to action.
- Healthy visits with few verified signups: Review whether the landing page delivers what the post promises. Check the page and signup flow on mobile, and test one change.
- A post with modest reach and promising signups: Try that angle again in the campaign and bring what you learned into the brief for a related routine.
Compare like-for-like windows and be clear about the denominator. An approval rate is based on decisions. A site conversion rate is based on measured visits. Clicks can include repeated openings. Your CRM, a longer analytics funnel, and the in-app report may use different definitions of signup attribution. A measured link and signup tell you the path you observed. To tell whether the campaign caused extra signups overall, use a comparison or test designed for that question.
For your next launch, start with one campaign, one destination, and one signup event. Confirm the first link and test the whole path. Then use Automations Insights to see what kept work from shipping and Campaign Insights to see what people did after it did. For the broader release context, see the Bolta Product Update.